GIMP shows up constantly in "free Lightroom alternative" searches, and for good reason: it costs nothing and runs on every major platform. What gets glossed over is that GIMP, on its own, cannot open a RAW file from your camera at all. Getting from a card full of RAW files to a finished edit in GIMP takes real assembly, and it is worth knowing exactly what that assembly looks like before committing to it as a workflow.
What GIMP actually is
Per its own site, GIMP (GNU Image Manipulation Program) is "a freely distributed program for such tasks as photo retouching, image composition and image authoring." It is licensed under the GNU General Public License, meaning it is free to use with no purchase price, and its current stable release, checked on gimp.org in September 2026, is version 3.2.6. It runs on Windows 10 (build 1903 or newer) and Windows 11, macOS 11 (Big Sur) or newer with separate builds for Intel and Apple Silicon, and Linux, available as an AppImage, Flatpak, or Snap. Source: GIMP's own downloads page. GIMP is a general-purpose image editor first, closer in spirit to Photoshop than to Lightroom: it excels at pixel-level retouching and compositing, and was not designed around a RAW-first, catalog-driven photography workflow.
What GIMP is actually good at
None of this is a knock on GIMP as a piece of software. Layer-based compositing, selection tools, pixel-level retouching, and scriptable batch operations through its Script-Fu and Python-Fu interfaces are genuinely capable, decades-refined features, and GIMP has a large library of community plugins built around exactly that kind of work. Photographers doing composite work, heavy manual retouching, or image authoring that goes beyond adjusting a single RAW exposure are often better served by GIMP than by a RAW-focused tool that was never built for layers or compositing in the first place. The RAW gap below is specifically about photography's first step, getting from a camera file to a usable image, not a verdict on GIMP as an editor once it has pixels to work with.
GIMP 3.0, released in 2025, also closed a longstanding gap with non-destructive filter editing: most GEGL filters now stay editable after being applied, so a filter can be reopened, adjusted, toggled off, or deleted later rather than being permanently baked into the pixels the moment you commit it, and that non-destructive state saves and reloads with the native XCF project file. That is a genuinely significant change for GIMP's own editing workflow. It applies to filters and effects within GIMP itself, though, not to the RAW development step; it does not change anything about GIMP's inability to open a RAW file directly.
The RAW gap: why GIMP cannot open your camera files directly
GIMP has no built-in RAW decoder. A legacy plugin called UFRaw used to let GIMP open RAW files directly, but it is no longer actively maintained and does not work with GIMP's current 3.x releases. Without a working RAW path, dragging a CR3 or ARW file straight into GIMP either fails outright or opens whatever small embedded JPEG preview the camera wrote into the file, not the actual RAW data.
Building the plugin chain: a darktable front end
The most common working path is to develop the RAW file first in a separate, dedicated RAW processor, then hand the result to GIMP for retouching. darktable supports this directly through a "GIMP" export target combined with the darktable-gimp plugin: set GIMP as the external editor in darktable's preferences, develop the RAW file's exposure, white balance, and tone in darktable, then use its "Edit in GIMP" option to open a 16-bit TIFF of the developed image directly in GIMP for further retouching. The RAW decoding, exposure, and color work all happen in darktable; GIMP only ever sees a finished TIFF.
Building the plugin chain: a RawTherapee front end
RawTherapee can serve the same role, developing the RAW file first and handing off a TIFF, though it does not have as tight a live plugin bridge into GIMP as darktable's export-and-edit option. The practical workflow is similar in shape: open and develop the RAW in RawTherapee, export a TIFF, then open that TIFF in GIMP for the parts GIMP is actually good at, like spot retouching or compositing multiple images together. Both darktable and RawTherapee use the LibRaw library under the hood, which is why either one can decode RAW files from a very wide range of camera models.
Who actually ends up building this chain
In practice, the photographers who commit to a GIMP-plus-RAW-processor workflow tend to fall into a specific group: comfortable installing and configuring several pieces of free software, not put off by a setup process with more steps than a single commercial app, and genuinely needing GIMP's compositing or heavy retouching tools for at least some of their output rather than just wanting a free way to brighten RAW files. For someone who mainly needs exposure, white balance, and color adjustments on RAW files with no layer-based compositing, darktable or RawTherapee alone, without ever opening GIMP, already covers that job and removes an entire application from the chain.
What that chain looks like end to end
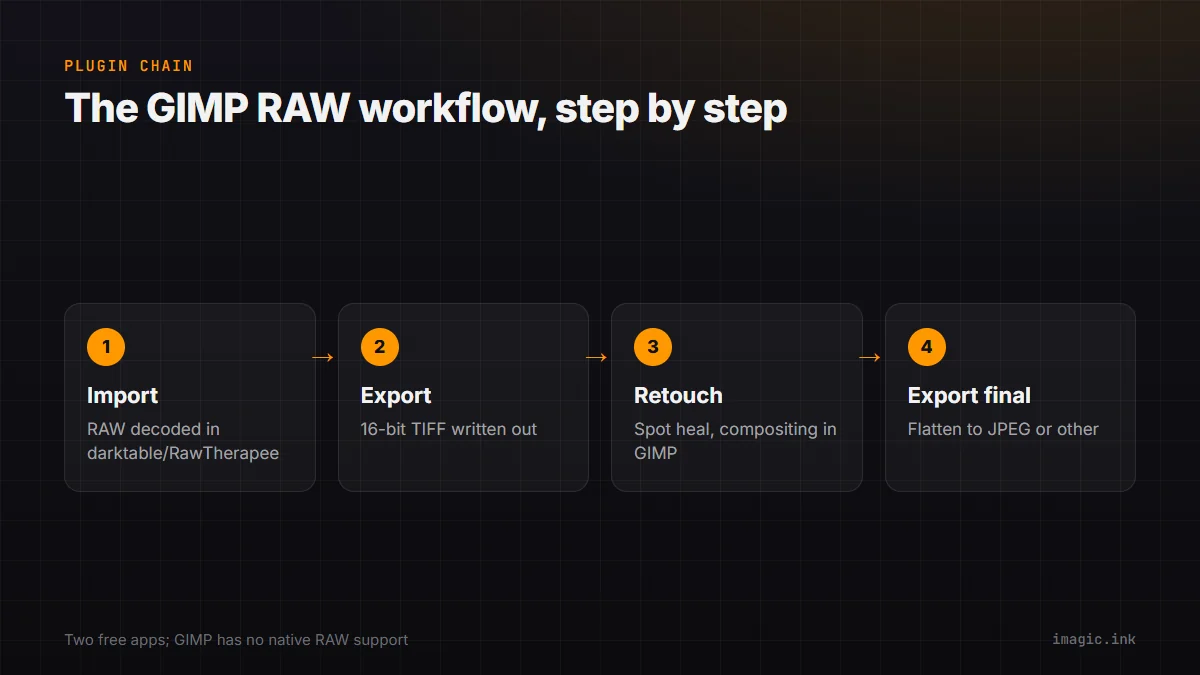
| Step | Tool | What happens |
|---|---|---|
| 1. Import | darktable or RawTherapee | RAW file decoded, exposure/white balance/tone adjusted |
| 2. Export | darktable or RawTherapee | Developed image written out as a TIFF, typically 16-bit |
| 3. Retouch | GIMP | Spot healing, compositing, layer work, final output |
| 4. Export final | GIMP | Flatten and export to JPEG or another delivery format |
Can you script around the manual handoff?
GIMP's own Script-Fu (a Scheme-based scripting language built into GIMP) and Python-Fu interfaces do support genuine batch processing: a script can walk an entire folder of images and apply the same operations to each one without a human clicking through every file, which is a real and useful capability once images are already in a format GIMP can open. The catch is exactly where this chapter started: that batch script still needs a folder of TIFFs or JPEGs that darktable or RawTherapee already developed from the RAW files, since GIMP's scripting engine has no more native access to RAW decoding than GIMP's regular interface does. Both darktable and RawTherapee have their own separate batch and command-line export tools for the RAW-to-TIFF step, so a fully scripted pipeline is possible in principle, develop a folder of RAWs via a RAW processor's own batch export, then run a GIMP script over the resulting TIFFs, but it means maintaining two separate scripting environments rather than one, and building that pipeline yourself rather than getting it out of the box.
What breaks down at volume
This chain is genuinely workable for a handful of images where GIMP's compositing and retouching tools are actually needed. It falls apart fast at shoot-day volume. Neither darktable nor RawTherapee nor GIMP includes AI quality scoring to flag which of a thousand frames are sharp, which have closed eyes, or which are near-duplicates of each other; that review stays fully manual, frame by frame, in whichever tool you use for the first pass. And every image that needs GIMP's retouching specifically means a three-step, two-application handoff repeated per photo, not a single batch operation. For a handful of hero shots that is a reasonable amount of extra work. For a full shoot's worth of files, it is a lot of repetitive manual handling with no automated review step anywhere in the chain.
The full chain, side by side with a single-app tool
| What you need | GIMP-based chain | Single-app tool |
|---|---|---|
| Cost | Free (GIMP + darktable or RawTherapee) | Free to paid depending on tool |
| Apps involved | Two: a RAW processor, then GIMP | One |
| RAW decoding | Via darktable or RawTherapee (LibRaw) | Built into the single app |
| AI-assisted culling | None in any of the three tools | Varies by tool |
| Batch operation across a full shoot | Manual per-image handoff, or a custom two-stage script | Native batch export |
The free chain wins decisively on cost and on GIMP's actual editing depth once an image reaches it. A single-app tool wins on the number of manual steps between a card full of RAW files and a finished export, especially at volume, where the free chain's two-application handoff has to be repeated for every single image rather than run once across a batch.
Where this fits against an AI-scored, single-app workflow
imagic exists at a different point on this spectrum: AI-assisted culling with sharpness, closed-eye, and composition scoring, duplicate and burst grouping, and RAW development through its own built-in engine, all in one application, for a one-time price rather than free. It does not do GIMP's kind of pixel-level compositing, layer-based retouching, or generative fill, so a job that genuinely needs those tools still needs GIMP or a comparable editor regardless of what culls and develops the RAW files first. The honest comparison is not "which one wins" but which stage of the job each tool is actually built for: GIMP for open-ended pixel editing, darktable or RawTherapee for RAW development, and imagic for the review and first-pass editing step that happens before either of those, minus the per-image manual assembly the free chain requires.
For a closer look at the two free RAW processors this chain depends on, see imagic vs darktable and imagic vs RawTherapee, and this roundup of open-source photo editing tools covers where GIMP fits alongside them more broadly. The Software Comparisons category has the rest of these breakdowns.
Frequently asked questions
Can GIMP open RAW files on its own?
No. GIMP has no built-in RAW decoder, and its old UFRaw plugin is unmaintained and incompatible with current GIMP 3.x releases. It needs a separate RAW processor like darktable or RawTherapee to develop the file into a TIFF first.
Is the darktable-plus-GIMP workflow actually free?
Yes. GIMP, darktable, and RawTherapee are all free, open-source software with no purchase price, available on Windows, macOS, and Linux.
Does this chain scale to a full shoot day of RAW files?
Not well. Every image needing GIMP's retouching tools requires a manual develop-then-export-then-open handoff, and none of the tools in the chain include AI-assisted culling to help pick keepers first, so it works better for a handful of images than a full shoot.