What Photo Editing Automation Actually Means
Photo editing automation isn't about handing your best frames to a robot and hoping for the best. It's about removing the repetitive decisions, the culling, the consistent color matching, the repeated export steps, so the editing time you actually have goes toward the images that deserve your full attention. For a working photographer, that's not a luxury. Shoot volume keeps climbing, modern sensors produce enormous RAW files and clients expect faster turnaround, while the hours in a week stay fixed.
The word "automation" tends to conjure two extremes: a magic button that edits everything for you, or a worry that automating anything means lower quality. Neither is accurate. Good photo editing automation is selective. It takes over the parts of a shoot that are genuinely mechanical and leaves the parts that need a trained eye exactly where they belong: with you.
What to Automate, and What to Always Edit by Hand
The useful question isn't "should I automate my editing," it's "which stages of my pipeline are mechanical enough to automate safely." Three stages hold up well:
- Culling. Sorting a 40-frame burst down to the one sharp, well-exposed frame is a scoring problem, not a creative one. An engine that measures sharpness, exposure, noise, and duplicate similarity across a shoot does this faster and more consistently than tired eyes at 11pm.
- Consistency. Applying the same white balance correction, exposure lift, or color grade across 200 images from the same scene is repetition, not judgment. Once you've decided how a set should look, applying that decision 200 times is exactly what software should do.
- Export. Generating a web-sized JPEG set, a print-resolution TIFF set, and a client-gallery set from the same edited batch is pure file handling. There's no reason to click through that manually.
What should stay firmly manual: the hero shots. The ceremony kiss, the cover image for a portfolio, the frame a client will print large. Automation can narrow 3,000 photos down to the 400 that matter and apply a consistent base look to all of them, but the final call on which frame tells the story, and any fine retouching on that frame, is still yours. Treat automation as the first 80 percent of the work, not the last 20 percent.
The Three Levels of Photo Editing Automation
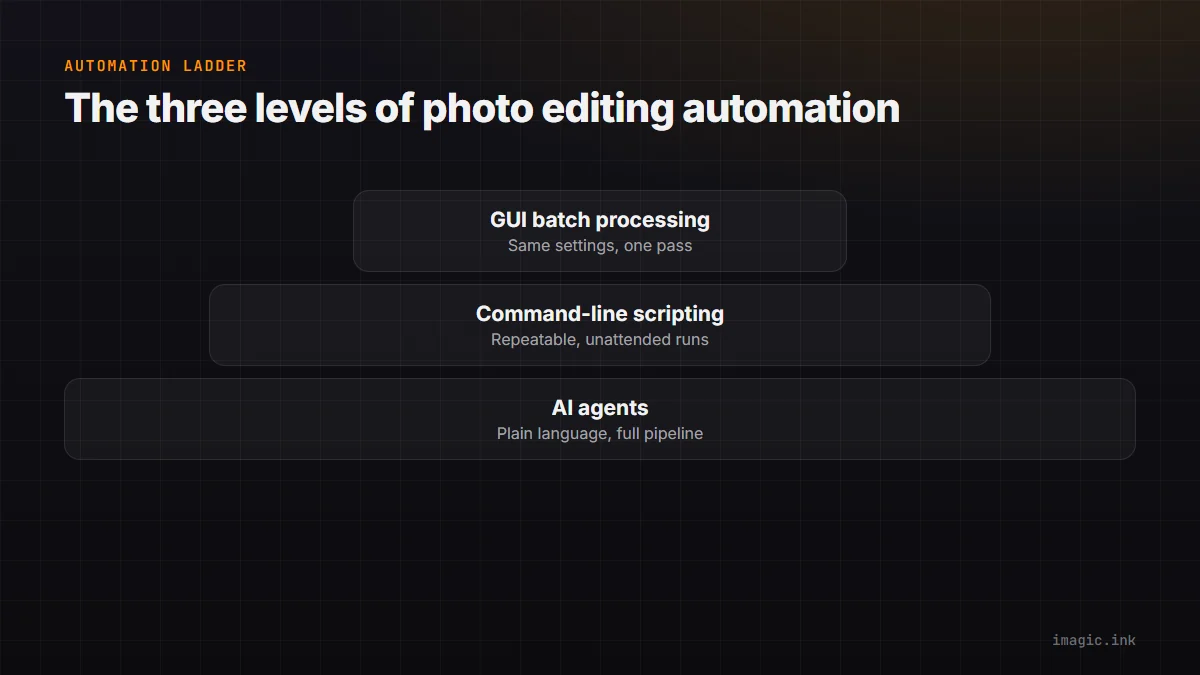
Automation in photo editing isn't one thing, it's a ladder. Most photographers climb it gradually as their volume grows.
Level 1: GUI Batch Processing
The entry point. You select a folder, apply the same crop, exposure correction, or preset across every image in it, and export in one pass. Every serious photo editor supports this, and it's usually the first automation habit photographers build without even naming it that. It's fast to learn and needs no scripting knowledge, but it stops at "same settings for every photo" and can't make per-image decisions like culling.
Level 2: Command-Line Scripting
The CLI level treats your editing pipeline as a repeatable command instead of a series of clicks. A command like imagic --headless --scan ~/Shoots/2026-08-09-Client --analyse --export can scan a folder, score every frame, and export the keepers, unattended, on a schedule, or chained into a larger script. This is where automation stops being "faster clicking" and starts being infrastructure. See Photo Editing with a CLI for the full flag reference.
Level 3: AI Agents
The newest level: instead of memorizing flags, you describe what you want in plain language to an MCP-connected agent, and it drives the culling, editing, and export itself. Running claude mcp add imagic -- imagic-mcp connects Claude Code, or another MCP client, to imagic's Max-tier server, so a prompt like "cull last night's shoot, keep my best 300, apply my portrait style, and export web-sized JPEGs" runs as a single conversation instead of a checklist. See the imagic MCP server page, how the imagic MCP server works, and a full agent workflow walkthrough for the details.
The Time Math: Automating a Wedding Shoot
Numbers make automation's case better than opinions do. Take a realistic wedding shoot: roughly 3,000 RAW files across ceremony, portraits, and reception.
- Manual culling: reviewing 3,000 frames at a comfortable pace runs 6 to 10 hours, spread across evenings, before you've edited a single image.
- Automated culling: an AI scoring pass across the same 3,000 frames typically finishes in well under an hour, leaving you a shortlist to review rather than a full library.
- Style application: manually matching color and exposure across 400 selects, frame by frame, can eat another full day. A calibrated style profile applies your look to the same 400 selects in minutes.
- Export: generating a web gallery, a print set, and a client-review set by hand is another hour of repetitive clicking, or a single scripted export pass.
The saved hours don't disappear, they move. Photographers who automate culling and consistency spend that reclaimed time on the images that actually need hand retouching, or simply get their evenings back. For the full pipeline breakdown, see Automated Wedding Photo Editing: 3,000 RAWs to Delivery.
Building Your Automation Toolkit
A dependable automated pipeline needs a few specific pieces, not a pile of disconnected tools:
- An objective culling engine. Something that scores sharpness, exposure, noise, and duplicates the same way every time, rather than an "AI enhance" button guessing at aesthetics. imagic includes AI culling in every tier, Lite, Plus, and Max.
- A scriptable interface. A CLI you can run headless, on a schedule, or from another script, for repeatable batches without a GUI in the loop. Part of imagic Max.
- A calibrated style, not a generic preset. imagic's style calibration learns your own editing choices from up to 8 guided edits, so batch consistency reflects your eye instead of a stranger's LUT. Also part of imagic Max.
- An MCP connection, if you want natural-language control. For photographers who'd rather describe an outcome than memorize flags, an MCP-enabled client turns the CLI into a conversation. Also Max.
All of this, MCP, the CLI, and style calibration included, is available in imagic's 500-photo free trial. No card required, and the trial includes everything in the Max tier, so you can build and test a real automated pipeline before deciding whether to buy.
FAQ
Will automating my culling and edits make my photos look generic?
Not if you calibrate the tools to your own style rather than accepting factory defaults. Culling automation scores technical quality, sharpness, exposure, duplicates, it doesn't replace your taste. Style automation, done right, is built from your own edits, not a stranger's preset pack.
Do I need to know how to code to automate my photo editing?
No. GUI batch tools require no scripting at all, and even the CLI level uses plain flags rather than programming. The agent level goes further in the other direction: you just describe what you want in a sentence.
What's the difference between GUI batch processing and a CLI?
GUI batch tools apply one fixed set of settings to a folder through clicks. A CLI treats the same operation as a command you can schedule, chain, or run unattended, which matters once your volume grows past a few dozen images per shoot.
Is photo editing automation only worth it for high-volume shooters?
It pays off fastest for wedding, event, and real estate photographers shooting thousands of frames per session, but even a hobbyist with a 200-photo travel folder saves real culling time. The threshold is lower than most people assume.
If you're ready to see what a real automated pipeline looks like on your own shoots, imagic's 500-photo free trial includes AI culling, the CLI, style calibration, and MCP support, no card required. Start with one folder and see how much of your evening you get back.